❮
~14 minute read
Feb 2026
Table of contents
Figura Basics
Globals
Maybe the single most important thing in Figura is the globally accessible variables that are instances of all the APIs that are available. Whenever you find any API on the wiki or figs, it’s name will be something like ActionWheelAPI or EventsAPI SoundsAPI and there is always a global variable that you can use to access those which are called action_wheel or events or sounds.
These are also listed as “Global Objects” in Figs on the left hand side.
Events
Tick And Render
You already know that lua code runs and finishes pretty much immediately. But most of the time you want your code to do things the entire duration while youre wearing the avatar. Thats where events come in. The most important event is the tick event, which is called every in game tick, which is 20 times per second. To register a tick event, simply create a tick function inside of the events table like this:
function events.tick()
    -- Figura will call this function every tick (20 times a second)
end

function events.render(delta)
    -- Figura will call this function every frame when your model is visible
    -- (Therefore depends on your fps)
end
Render Delta Smoothing
You will always want to do most stuff and calculations inside the tick event and then smooth them out in the render event by using the delta. Note that you are allowed to have multiple tick or render functions (unlike regular functions which names have to be unique).
The usual delta smoothing process looks something like the next snippet and is needed quite often. It works by interpolating between the last and current ticks calculated value with the render delta, which is the fraction how far this rendered frame is in between the last and next tick.
local previousValue = 0
local currentValue = 0

function events.tick()
    previousValue = currentValue -- remember the previous currentValue
    currentValue = someThingThatGetsANewValue() -- update the actual currentValue
end

function events.render(delta)
    -- interpolate and apply the value to something
    models:setPos(0,math.lerp(previousValue, currentValue, delta),0)
end


-- just an example function, you don't have to use this
function someThingThatGetsANewValue()
    return math.sin(world.getTime()*0.1)*5
end
Checking If The Player Is Loaded
If you need to access the player global at the start of your script, this will lead to an error. Use the entity_init event, which runs once when the player loads in.
local position = player:getPos() -- ERROR! Player hasn't loaded yet.


-- Correct way:
local position = nil
function events.entity_init()
    position = player:getPos()
end
Don’t worry, for the tick and render events the player is already guaranteed to run.
However, for some events you should add a if player:isLoaded() check before trying to access the player. This includes pings, world events, sound events probably more (just think if whatever the event is might be able to happen when your player character isn’t here).
In such cases you can simply return from the function and not do anything, see also in the next section about replacing sounds.
Replacing Sounds
function events.ON_PLAY_SOUND(id, pos, vol, pitch, loop, category, path)
    if not path then return end -- don't trigger if the sound was played by figura (prevent infinite loop)
    if not player:isLoaded() then return end -- don't trigger if the player isn't loaded
    local nearest, uuid = math.huge -- we will find the nearest player to the sound location
    for _, plr in pairs(world.getPlayers()) do
        local dist = (plr:getPos() - pos):length()
        if dist < nearest then nearest,uuid = dist,plr:getUUID() end
    end
    if player:getUUID() ~= uuid or nearest > 0.8 then return end -- don't trigger if the sound isn't near you

    ---------------------------------------------------------
    -- actual replacing starts here, feel free to edit below:
    if id:find(".step") then                                                  -- if sound id contains ".step"
        sounds:playSound("minecraft:entity.iron_golem.step", pos, vol, pitch) -- play a custom sound
        return true                                                           -- stop the actual step sound
    end
end
Other Events
Other useful events are listed on the wiki here ↗
Intervals And Timings
First we make a new tick event to make a constantly counting time variable. This will be used instead of world.getTime() because that can be inconsistent and jump around a lot if the server is very laggy. So instead we make a consistent global time counter, that we will assume is in your script for all the following snippets.
time = 0
function events.tick()
    time = time + 1
end
Run Every X Ticks
Runs once every 5 seconds (once every 5*20=100 ticks)
function events.tick()
    if time % (5*20) == 0 then
        print("This happens only every 20 ticks")
    end
end
Randomized Intervals
This one runs once every time a random amount between 100 and 200 ticks has passed.
local nextTrigger = 0
function events.tick()
    if time >= nextTrigger then
        nextTrigger = time + math.random(100,200)
        -- do something here
    end
end
Basic Timer
With this you can restart the timer any time by just setting myTimer = 100 (or any amount) for example in a keybind or action wheel or whatever else.
local myTimer = 0
function events.tick()
    if myTimer > 0 then
        myTimer = myTimer - 1
    elseif myTimer == 0 then
        print("timer ended")
    end
end

-- assume in keybind:
myTimer = 100
Alternatively you could also utilize our time counter by setting this triggerTime = time + 100 so it’s a timestamp 100 ticks in the future.
function events.tick()
    if time == triggerTime then
        log("timer ended")
    end
end

-- assume in keybind:
triggerTime = time + 100
You can also use runLater which is a tiny library, check it out here ↗. It helps scheduling things to run at a later time, or wait until some condition turns true.
Accessing The BlockBench Model
Figura provides a global variable called models which contains all your blockbench files. This will give you access to your BlockBench models. You can access a specific model with models.filename. It is structured the exact same way the outliner in BlockBench shows your cubes and groups.
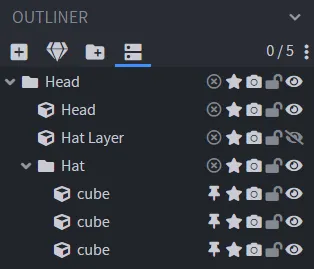
models.mymodel.Head.Hat:setVisible(false) -- hides the hatSee also the Model Part Indexing Tutorial.
To access BlockBench model parts you use the models global. Its a table containing all models and the groups and cubes in a tree structure. Once you accessed a model part you can use all the functions on them that you can find in ModelPart.
Iterating The Model Tree
If you want to go over all model parts in a loop use either a depth first or breadth first approach, for most things depth first is fine since the code is shorter.
The process function would be whatever you want to do on each model part.
Depth First Search:
function dfs(part, process)
    process(part)
    for _, child in ipairs(part:getChildren()) do
        dfs(child, process)
    end
end
Breadth First Search:
function bfs(part, process)
    local queue = {part}
    while #queue > 0 do
        local current = table.remove(queue, 1)
        process(current)
        for _, child in ipairs(current:getChildren()) do
            table.insert(queue, child)
        end
    end
end
Example, look for any group including “Red” in the name and coloring them red.
dfs(models, function(part)
    if part:getType() == "GROUP" and part:getName():find("Red") then
        part:setColor(1,0,0)
    end
end)
Getting The Texture Of A Cube
The getTextures or getPrimaryTextures etc functions are all kind of broken and bugged. The most reliable way to get the texture of a part is by using getAllVertices.
This is because it returns a table with the texture names as the keys and lists of vertices as the values. This means we can use it just for the texture names portion. Usually you go over those vertices like this, which is also useful to know just in general:
for textureName, vertexList in pairs(cube:getAllVertices()) do
    for index, vertex in ipairs(vertexList) do
        print(index, vertex:getPos())
    end
end
But we can just use it for the texture name and return the texture with that name:
local function getTexture(cube)
    for textureName in pairs(cube:getAllVertices()) do
        return textures[textureName]
    end
end
Accessing The Vanilla Model
If the standard keywords like Head, Body, RighArm etc dont quite perfectly fit for you cou can access the vanilla rotation and position values of all the body parts and then manually apply them to your model while also adjusting those values. For example, you could make the arms or legs swing around less far, or you could add limits to the head rotation.
Make sure not to use keywords when doing this, otherwise it will double the movement! (e.g. change groups like LeftLeg to something like leftleg to remove keyword) See what parts are in vanilla model here.
function events.render()
    -- copy cape 1:1 no change
    models.model.cape:setRot( vanilla_model.FAKE_CAPE:getOriginRot() )
    -- copy leg with simple change like scaling
    models.model.leftleg:setRot( vanilla_model.LEFT_LEG:getOriginRot() * 0.5 )
    -- more flexible change by storing in a variable
    local headrot = (vanilla_model.HEAD:getOriginRot()+180)%360-180
    models.model.head:setRot(0,headrot.y,0)
end
You might be confused about the (vanilla_model.HEAD:getOriginRot()+180)%360-180 in there, and this is only needed for the vanilla head because minecraft can kind of freak out and give incorrect rotation values if you really quickly fling the camera around, this math just fixes that issue and returns the real head rotation.
User Input
Pings
Before actually reading any user input, note that pings are required. They are used to send information that is only available to the host (you) to all other players. This applies to all user input since what you type on your keyboard or click with your mouse is not automatically synced to other players. To make a ping, create a function inside the pings table, for example we make a custom ping named setHat to change the visibility of a model part hat:
function pings.setHat(value)
    models:model.Head.Hat:setVisible(value)
end
Whenever you call pings.setHat(value) this function will be executed on all instances of your script (so on all players including yourself). Calling a ping function only sends a ping on the host instance of the script, other players seeing your model and running the script just ignore this line of code. Instead they will run the function whenever they receive that they should from the host.
For more information about pings see pings wiki page ↗ and learn about common ping misconceptions.
Basic Text Input
Similar to custom commands, here is how to ask an input from the player that they can type in chat. It works by temporarily registering a chat_send_message event that cancels the next message that is tried to be sent, and instead reads it as an input.
function input(question, callback)
    logJson(question)
    local e = events.CHAT_SEND_MESSAGE
    local function f(m) callback(m) e:remove(f) end
    e:register(f)
end
Example:
function pings.printName(name)
    print("Hello "..name.."!")
end
input("Whats your name?", pings.printName)
Custom Commands
Here is how to make a very simple commands system. Example with greet comand /greet Steve would print “Hello there Steve!”. All the separate words in your command can be accessed with cmd[n]. In the greet example it would be cmd[1] is “/greet”, cmd[2] is “Steve”, and an later ones such as cmd[3] are nil.
You can also use characters other than ”/” for the start of your commands if you want.
-- First add the commands you want into this list
local commands = { "/greet", "/test" }
function pings.command(cmd)
  -- Then put your command logic here in this ping

  -- Example command: /greet
  if cmd[1] == "/greet" then
    print("Hello there " .. tostring(cmd[2]) .. "!")
  end

  -- Example command: /test
  if cmd[1] == "/test" then
    print("This is a test command.")
  end
end

-- Backbone of the commands system, don't edit this
function events.chat_send_message(msg)
  local cancel = true
  for _, command in ipairs(commands) do
    if msg:match("^"..command:gsub("([^%w])", "%%%1")) then cancel = false end
  end
  if cancel then return msg end
  local cmd = {}
  for w in msg:gmatch("%S+") do table.insert(cmd, w) end
  pings.command(cmd)
  return nil
end
Action Wheel
First off, check out the basic Action Wheel Tutorial ↗. It also explains how to make a toggle action.
The action wheel allows us to bring up a wheel by pressing B and we can attach functions to the slots.
local mainPage = action_wheel:newPage()
local action = mainPage:newAction()
    :title("Click me")
    :item("minecraft:grass_block")
    :setOnToggle(function(state) -- anonymous function, does not have a name
        pings.setHat(state) -- for example we call the ping from before
    end)
Toggle More Than Two States
Many times people would like more than two things to toggle between, so here is how to add an arbitrary amount of toggles to only one single action.
Use a number that counts up and then cycles back around to 1 when the max value was hit, for example increase it every time you click the action and when it is above 3 then go back to 1.
The way to do that in just one line would be like follows. It cycles the variable n in a range 1 to X. Here some examples:
-- universal, amount could be 1, or -1, or any number
n = (n - 1 + amount) % X + 1

-- increment by 1   (n - 1 + 1)
n = n % X + 1

-- decrement by 1   (n - 1 - 1)
n = (n - 2) % X + 1
And how to actually use it in the action wheel.
local tbl = {"option1", "option2", "option3"}
local selected = 1
function pings.select(x)
    selected = x
    print(tbl[selected])
end
pings.select(1)
action:onLeftClick(function()
    pings.select(selected % #tbl + 1)
end)
For clarity, the following code would do the same thing and might be a bit easier to understand:
local tbl = {"option1", "option2", "option3"}
local selected = 1
function pings.select(x)
    selected = x
    print(tbl[selected])
end
pings.select(1)
action:onLeftClick(function()
    selected = selected + 1
    if selected > #tbl then
        selected = 1
    end
    pings.select(selected)
end)
If you would like a copy paste snippet that adds a more polished version of such a multiple choices action click here.
You can click or scroll to switch through the choices. Icon and title automatically updates with the selected choice in bold.
Example (note this is without a ping, and expects a mainPage to already exist):
local myChoices = {
  {text="Choice 1", item="acacia_boat"},
  {text="Choice 2", item="oak_boat"},
  {text="Choice 3", item="spruce_boat"},
}
local action = mainPage:newChoice(myChoices,function(index)
  log("selected", index)
end)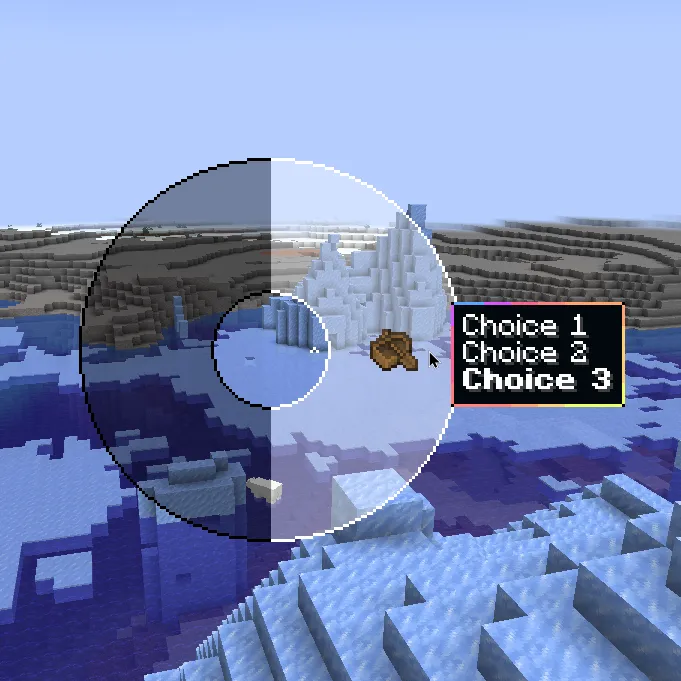
To be able to use it, copy paste this snippet above/before your action wheel code:
local figuraMetatablesPage__index = figuraMetatables.Page.__index
figuraMetatables.Page.__index = function(slf, key)
  if key == "newChoice" then
    ---@class Minecraft.RawJSONText.Component
    ---@field text string
    ---@field item ItemStack|Minecraft.itemID
    ---@class Page
    ---@field newChoice fun(self:Page,choices:Minecraft.RawJSONText.Component[],callback:fun(idx:number,self:Action)):Action
    return function(self, choices, callback)
      choices = parseJson(toJson(choices))
      for _,c in ipairs(choices) do
        c.bold = false
        c.text = c.text..'\n'
      end
      choices[#choices].text = choices[#choices].text:gsub('\n$','')
      local idx = #choices
      local action = self:newAction()
      local function interact(dir,act)
        if player:isLoaded() then
          sounds:playSound("block.copper_bulb.turn_on",player:getPos(),1,1)
        end
        choices[idx].bold = false
        idx = (idx - 1 - math.sign(dir)) % #choices + 1
        choices[idx].bold = true
        action:title(toJson(choices)):item(choices[idx].item)
        callback(idx,act)
      end
      interact(-1)
      action.rightClick = function()interact(1,action)end
      action.leftClick = function()interact(-1,action)end
      action.scroll = interact
      return action
    end
  end
  return figuraMetatablesPage__index(slf, key)
end
Fallback Action Item
If you want to make your avatar work for multiple Minecraft versions, make sure the code doesn’t error when it encounters an item that doesn’t exist yet in this version.
local function firstValidItem(...)
  for _, i in ipairs({...}) do
    if pcall(function()
      _ = world.newItem(i)
    end) then
      return i
    end
  end
  return "minecraft:air"
end
Example:
action:setItem(firstValidItem("iron_spear", "wind_charge", "snowball"))Keybinds
Check out the Keybinds Tutorial ↗ and a list of keys can be found here on Figs ↗.
function pings.onPressG()
    print("G key was pressed!")
end
keybinds:newKeybind("Send Hooray Button", "key.keyboard.g")
    :setOnPress(function()
        pings.onPressG()
    end)
Toggle Keybind
How to make a toggle keybind, similar to the inbuilt toggle action.
local keybindState = false -- This variable gets toggled at every key press
function pings.keybindToggled(state)
    keybindState = state
    -- put your code here
end
local keybind = keybinds:newKeybind("Display Name", "key.keyboard.space")
    :setOnPress(function()
        pings.keybindToggled(not keybindState)
    end)